Fujifilm FinePix A303 Focus Error ( Fokusfehler)
... and how to possibly fix it!
 Fuji offers a nice set of digital cameras. However, the so-called "focus error" is a very common fault, suddenly appearing as an error message after some months or years of usage. It totally renders your camera unusable, as the autofocus and the shutter release are deactivated. This guide may help you to understand and fix the problem.
PLEASE NOTE: Use the instructions below at your own risk. You may damage the camera or suffer an electrical shock. If your camera is still under warranty, better contact the Fujifilm customer service for a free repair. Otherwise, this guide might save you repair costs of about 150,- EUR.
Identifying an arising problem
In my case, the camera behaved strange for some time just before the "focus error" occured. Once the lens was stuck outside when I switched the device off, but after switching on and off again it retracted as usual. Later, when I autofocused once and once again (by pressing the shutter release half way down), the preview got more and more blurred. Switching off and on always gave me back a sharp image, but the blur effect remained. Finally, a friend of mine autofocused too much and the camera came up with the "focus error". After switching on, the LED at the viewfinder was blinking red for five seconds and the display said "FOCUS ERROR". I could zoom in and out (with a five seconds pause of a blinking red LED after zooming) but not take any photo anymore (the camera refused to do so, just ignoring any use of the shutter release button). When switching off, the lens just remained outside, making it impossible to stuff the camera back in its bag.First try: Cleaning the autofocus sensor
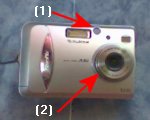 A friend told me to clean the autofocus sensor (1), so I breathed on it and used a soft cloth to clean it, but this did not help at all. I tried this with the lens itself, too, but without any further effort.
Second try: Brute force
As I was still able to move the lens to and fro (by zooming), I tried to hold the lens on its outer ring (2), but this just gave me a "zoom error". Hitting the cam as well as holding or moving the outer lens while switching on or off did not work, either.Third try: Resetting the camera
Remember the times when replacing the memory card or batteries and your camera tells you "date and time not set" afterwards? This gave me the idea to reset the camera. After a week without batteries I put them in again and, when closing the battery cover, the lens retracted. The camera was usable again, but having an extended version of the blur effect (as described above), and images were not as sharp as before. I managed to get back to the "focus error" by extensive autofocusing.Fourth try: Disassembling the camera
For months, my stubborn baby just lay around, me taking photos with my mobile phone instead, until I decided to try disassembling what was left. This finally worked for me, so I will try to describe the steps and help you avoid my mistakes.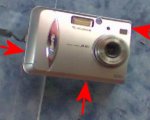 At first, you need a suitable cross-head precision screwdriver (
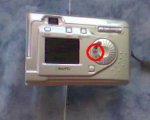 Another preliminary step is to take out the batteries some days before the disassembly. The flash capacitor may contain electric charge which is hazardous or at least painful for you to discover.
Make sure the camera mode dial is in "still photography mode" and remove the three casing screws. Then use your fingernails or a slot-head screwdriver to remove the back cover. It may be helpful to open the battery cover before, but you do not need to.
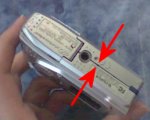
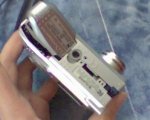
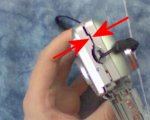 To the left you can see where to apply the screwdriver in order to remove the sort of snapped-in back cover.
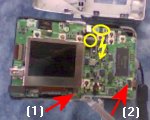 The camera will now look like this. Beware of the areas marked with yellow circles, as these are the connectors of the flash capacitor. As the battery case is fixed to the front cover, we need to remove a screw (1) and a cable (2), the latter by moving the white plastic clip which fixes the cable to the socket. It is now time to open the battery cover. Remove the memory card and take off the printed circuit board (PCB) along with the lens.
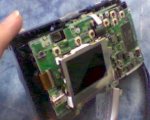
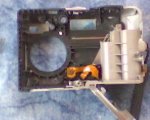 When first doing this, I had some trouble with the shutter release button (soldered on the PCB) which went into pieces and needed a reassembly, so make sure it does not get stuck anywhere (e.g. to the pin of the plastic button). Maybe putting a piece of paper in-between will avoid this. Remember to keep the flash capacitor in mind (mine had about 250 volts DC which does not feel that good).
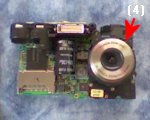
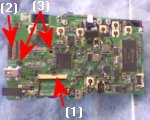 After removing the display from its socket (1), again by loosening a plastic clip, we can examine the lens. As the motor mechanics and gearboxes are still inaccessible, there is no way to move the lens either, so I tried to take it off. Turn up the brown clip to disconnect the cable (2), then remove the two black screws (3).
Without going any further, my first attempt to remove the second black screw failed, so I tried if the device would work anyway and reassembled it (without the screws). Much to my surprise, the lens retracted. I had a look inside again and now found two grooves in the outer black plastic ring of the lens (4) as well as some white crumbs. I removed the crumbs carefully (maybe the grooves could use some grease) and put anything back in the case. The blur effect had gone for good and the camera is working like before. I am very happy :D
Further advice
As you see, my focus error seemed to be caused by some dirt and/or loose contacts. The camera refused to work in order to prevent further damages. If the above steps do not solve your focus error, a full disassembly (and cleaning) of the lens may be required. Keep in mind that the lens is an even more complex mechanical system than the rest of the camera, it requires technical skills and patience (and maybe additional screwdrivers) to repair it by yourself. It is always a good idea to keep a second camera for progress snapshots, so you will be able to put anything back in its right position.Links:
Fujifilm FinePix A303 Support and Contact Center (USA)
Fujifilm.com
Wikipedia: Focus error
Startseite