DIY: The Rapax box
 Our idea to this was taken from a promotional gimmick of
the German Telekom in Berlin. We have been there on a class
trip in the 10th grade. This gimmick consisted of a few
pasteboard strips which were printed in pink, black and
white. These strips were put together to a fascinating
object. You could fold it, saw something new, and after
four times of folding it started from the beginning.
This pasteboard object was such a fascinating thing that we even competed against each other who was the fastest in folding it four times. Then we examined the object and made a Rapax-gimmick out of it.

Made by: Manuel H.
Published: 20-Sep-1998, 18:56 CET

Made by: Manuel H.
Published: 20-Sep-1998, 18:56 CET
And so you can make one for yourself:
Step 1:
Print the first image centered on a sheet of paper.
Step 2:
Print the second image also centered on the back of the same sheet.
Step 3:
Hold this sheet of paper towards any source of light. The
outlines of the printed objects must fit to each other. If
it doesn't fit, adjust your printer (by inserting the paper
some more left or right) and repeat steps 1 and 2. Otherwise
you can print both images on separate sheets of paper and then
paste them together that the images' outlines fit.
Step 4:
Cut both objects off the paper. Now you should have two objects
of the same size. One has a pink front and a yellow back, the
other one is blue and green.
Step 5:
Cut the blue-green object vertically through the black line,
then cut the pink-yellow object horizontally through the black
line.
Step 6:
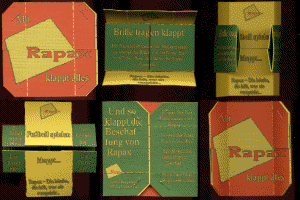
Lay the objects onto the table as seen in the first image.
Now spread some glue onto the four white squares of the blue
object (you may use fluid glue as well as a glue stick).
Step 7:
Lift both strips of the pink object and lay them fittingly
onto the two strips of the blue object, so that their white
squares stick together. Caution: the pink strips must be
horizontally laid onto the vertically arranged blue strips.
That's the way to fold it:
You now got an object having a pink front and a green back.
The pink surface may be the upper.
       |-----------------------|
       |                       |
       |  Mit                  |
-->    |                       | <-- fold here
       |                       |
       |                       |
       |-----------------------|
       |          Rapax        |
       |                       |
-->    |                       | <-- fold here
       |                       |
       |           klappt alles|
       |-----------------------|
Now fold - carefully - the upper pink strip backward,
so that its upper edge touches the back's center. The
lower pink strip is also folded backward: its lower edge
reaches the back's center either.
You should be able to see the text "Brille tragen klappt" now.
            fold       fold
            here       here
             |           |
             v           v
       |-----------------------|
       |                       |
       |         Rapax         |
       |-----------|-----------|
       |Brille trag|en klappt  |
       |           |           |
       |           |           |
       |           |           |
       |           |           |
       |-----------|-----------|
       |      Rapax-Die ...    |
       |                       |
       |-----------------------|
             ^           ^
             |           |
Next we fold the left half of the construction backward, so that the left edge gets close to the back's center. We'll do the same with the right half: its right edge touches the back's center afterwards.
             |-----------|
             |           |
             |   Rapax   |
-->    |-----|           |-----| <-- fold here
       |Der  |Fußball    |Der  |
       | Schi|    spielen| Keep|
       |-----+-----------+-----|
       |Der  | klappt... |Die  |
       | Rase|           | Fris|
-->    |-----|           |-----| <-- fold here
             |Rapax-Die..|
             |           |
             |-----------|
Now all the important ridges are made. This time we fold the upper and the lower half backward. Each time one of the ridges is unfolded.
            fold       fold
            here       here
             |           |
             v           v
       |-----------|-----------|
       | Und so    |           |
       | klappt die| Fragen Sie|
       | Beschaf-  |        ...|
       | fung von  | Fragen Sie|
       | Rapax...  |        ...|
       |           | Erschlagen|
       |           |        ...|
       |           | Essen Sie |
       | RapaxGmbH |        ...|
       |           |           |
       |           |           |
       |-----------|-----------|
             ^           ^
             |           |
Last we fold the left and the right half backward. Again two ridges are unfolded, and we get the initially object.
       |-----------------------|
       |                       |
       |  Mit                  |
       |                       |
       |                       |
       |                       |
       |-----------------------|
       |          Rapax        |
       |                       |
       |                       |
       |                       |
       |           klappt alles|
       |-----------------------|
We hope you had much fun doing this little exercise.
< Prev | Next >